Contouring and highlighting can completely transform your face, giving it more definition and a natural glow. Whether you're a beginner or already familiar with makeup, using the right products like the blush and highlighter palette can help you achieve professional-looking results. This guide will walk you through the basics of contouring and highlighting, how to choose the best shades for your face shape and provide tips to help you perfect your makeup routine.
Understanding Contouring and Highlighting
Contouring and highlighting are simple techniques that help define and enhance your face.
-
Contouring uses darker shades to create shadows, giving the face structure and definition. You apply it to areas like your cheekbones, jawline, and sides of your nose to shape your face.
-
Highlighting brings out certain areas of your face by using lighter shades. It focuses on the high points, such as the tops of your cheekbones, the bridge of your nose, and the brow bones, to create a glowing, lifted appearance.
These techniques create a more balanced and sculpted look, perfect for any occasion.
Step-by-Step Guide to Contouring

1.Preparation: Prepping Your Skin (Primer, Foundation, etc.)
Start with a primer to create a smooth base for your makeup. The primer helps the makeup adhere better and last longer. Next, apply a foundation that matches your skin tone for an even base. This allows the contour and highlighting makeup tips to blend smoothly and look natural.
2.Mapping Out the Face: Identifying Areas to Contour
Contouring is all about creating shadows on your face. To begin, identify the areas where you want to create depth:
-
Cheekbones: Apply contour just below your cheekbones to make them appear more sculpted.
-
Jawline: Contour along your jawline for a more defined look.
-
Nose: A subtle contour along the sides of your nose can make it appear slimmer.
-
Forehead: If you want a smaller forehead, apply contour along the hairline to reduce its size.
3.Application:
-
Using your Pro Contour Palette, apply the contour shade in the areas you mapped out. Start with a light hand, as it's easier to build up than to remove excess product. For the best results, use an angled brush for precision.
-
After applying the contour, blend it using a brush to avoid harsh lines. Blending is the key to a natural look. Make sure you blend the contour into your foundation, creating soft shadows that mimic the natural structure of your face.
4.Common Mistakes to Avoid While Contouring
-
Too Much Product: It’s easy to overdo it. Start with a small amount and build up gradually.
-
Harsh Lines: Always blend! Harsh lines can make the contour look unnatural.
-
Wrong Shade: Choose a contour shade that’s only a few shades darker than your skin tone. Going too dark can create an overly dramatic effect.
Step-by-Step Guide to Highlighting

1.Key Areas to Highlight:
Highlighting adds a glow to your face and brings forward certain features. Here are the areas you should focus on:
-
Cheekbones: Apply highlighter to the tops of your cheekbones to create a radiant, lifted look.
-
Bridge of the Nose: A little highlighter on the bridge of your nose will make it look slimmer and add dimension.
-
Cupid’s Bow: A touch of highlight on your cupid’s bow accentuates your lips, making them look fuller.
-
Brow Bone: Highlighting your brow bone can help lift your brows and open your eyes.
-
Chin: A subtle highlight on your chin can create a well-rounded, balanced look.
2.Application Techniques:
When applying highlighter, it’s important to use the right amount for a subtle or bold effect. Here’s how:
-
Apply a small amount of product using a fan brush or fingertip for a subtle glow. Blend well to avoid harsh lines.
-
For a bold effect, layer the highlighter gradually. Start with a small amount and build up for an intense glow.
3.How to Achieve a Balanced Glow Without Looking Oily:
-
Choose a highlighter with a creamy texture for a dewy finish or a powder highlighter for a more matte, controlled glow.
-
Avoid over-applying highlighter all over your face. Stick to the high points, such as the cheekbones, nose, and chin, for a balanced, glowing effect.
-
Always blend the highlighter into your skin for a seamless finish. This prevents it from looking patchy or oily.
Using the Blush Palette to Complete the Look
Pick shades that match your skin’s undertone when using a blush and highlighter palette. Warm peach or coral tones suit warm undertones for a natural look, while pink or berry shades work well for cool undertones. The goal is to match your blush with your contouring for face shape to create a balanced look.

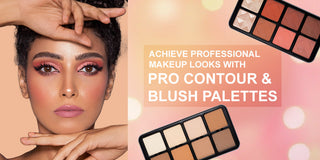
Image Description: A close-up image of the Pro Contour & Blush Palette open, with visible contour, blush, and highlight shades. The palette can be positioned next to a makeup brush, possibly with a subtle soft-focus background, showcasing how to use the products to create a natural, flushed look.
1.Where and How to Apply Blush for a Natural, Flushed Look
Apply blush on the apples of your cheeks, then blend it toward your temples for a youthful flush. If you want a sculpted effect, apply the blush slightly higher on your cheekbones. Start with a light hand and build the product gradually for a natural finish.
2.Tips for Blending Blush Seamlessly with Contour and Highlight
-
Blend, Blend, Blend: After applying blush, use a beauty sponge or makeup brush to blend the blush into your contouring and highlighting areas. This ensures a smooth transition and prevents harsh lines between the blush and other makeup.
-
Use Light Layers: Apply blush in light layers, especially if using a pro contour palette. Build the color gradually for a more natural finish.
-
Balance the Glow: If you’ve applied a lot of highlighter, go easy on the blush, and vice versa. The key is to maintain a balance between all elements of your makeup to avoid any one feature dominating.
Common Contouring and Highlighting Mistakes to Avoid
-
Overdoing Contour or Highlight:
Applying too much product can make your face look harsh or oily. Start with light layers and build up for a natural finish.
-
Using the Wrong Shades for Your Skin Tone:
Always choose professional makeup contour and highlighter shades that match your undertones. Test the products before applying them to ensure they blend well.
-
Failing to Blend Properly:
Blending is essential for a smooth look. Use a sponge or brush to blend contouring and highlighting products seamlessly into your skin.
Why Choose the Pro Contour & Blush Palettes
Key Features and Benefits
-
Pigmentation: The palettes offer rich and vibrant colors, ensuring a little product goes a long way.
-
Blendability: These palettes are easy to blend, providing a smooth and natural finish.
-
Shade Range: With shades that complement all skin tones, you’ll easily find the perfect match.
How These Palettes Simplify Your Makeup Routine
-
Beginner-Friendly: The easy-to-blend formula makes application simple for beginners.
-
Pro-Level Results: High-quality shades allow professionals to achieve precision and flawless results.
-
All-in-One: This palette simplifies your routine by offering contouring, highlighting, and blush all in one place.
Final Thoughts
Contouring and highlighting can transform your look by adding definition and radiance. The Pro Contour & Blush Palettes make it easy to achieve professional results with the right shades and tools, whether you're just starting or are a seasoned makeup artist.
For top-quality beauty essentials, Character Cosmetics is the perfect destination. Shop beauty products online, from contour palettes to everyday makeup, and enjoy premium options to enhance your routine. Whether buying makeup products online or exploring other beauty items, Character Cosmetics offers the best for all your needs. Start your online makeup shopping today for flawless beauty!
FAQs
1.How to Contour Like a Pro?
Ans: To contour like a pro, apply darker shades to create shadows on your cheekbones, jawline, and nose. Use lighter shades on the high points like your cheekbones and nose bridge. Blend well for a smooth, natural finish.
2.What’s the Best Contour Palette for a Flawless Look?
Ans: The best contour palette has multiple shades that complement your skin tone and blend easily.
3.What Is Makeup Contouring for Beginners?
Ans: For beginners, start with light contour shades, blend well, and focus on basic areas like cheekbones and jawline.
4.How Do I Make My Contour Last All Day?
Ans: To ensure your contour stays all day, dust a bit of setting powder after contouring to lock the makeup in place. A good quality contour palette with long-lasting formulas also helps your look last longer, even in hot or humid conditions.
5.Can I Use a Highlighter and Blush Together?
Ans: Absolutely! Blush adds a healthy flush of color, and highlighter gives a glowing finish. Together, they can make your face appear more vibrant and dimensional. Just blend both products well to create a smooth, natural look.
6.What Are Some Highlighting Makeup Tips for a Radiant Glow?
Ans: To achieve a radiant glow, focus on applying your highlighter to the tops of your cheekbones, the bridge of your nose, and the cupid's bow. Blend well to avoid harsh lines. Choose a creamy highlighter or a setting spray to lock in the shine for a long-lasting highlight. These highlighting makeup tips can enhance your beauty by creating that perfect luminous finish.


